 Select language
As a free service, you find a way to transfer your IMAP accounts to your new web hosting at helloly.com at https://mailtransfer.helloly.com .
Recommendation: We recommend that you transfer your email accounts before the actual domain transfer. This will ensure a seamless transfer of your email accounts.
Notes: Transferring your email accounts requires a certain amount of effort. The individual steps are quite simple to perform, but the entire process is relatively long.
Read through the instructions carefully and allow 30-45 minutes, depending on how many mailboxes you want to transfer and how large they are.
General information about the mailbox migration tool
- After an IMAP transfer, please check the destination mailbox for completeness.
- Helloly has no influence on the behavior of external IMAP services and cannot guarantee their functionality or a complete email export.
- Please ensure that our mail transfer tool returns a successful response (100% done) at the end of a transfer operation.
We will discuss two special cases—namely, Gmail and Microsoft 365 email mailboxes—at the end of this article.
Step 1: Determine the mailbox sizes of your email accounts, the IMAP server of your existing provider, and the auth code.
First, determine the sizes of your existing email mailboxes with your current provider.
Depending on the package, we offer between 2 GB and 10 GB of storage space per email mailbox with the option of adding an additional 10 GB to each web hosting or mail-only package. You can find out how to upgrade your existing package at the end of this article.
Please also determine the IMAP server of your existing provider (e.g., imap.youroldprovider.com).
Please also determine the auth code for your domain in order to transfer it to helloly.
Tip: Delete old and unimportant emails, newsletters, and spam emails to save storage space.
Step 2: Create your email accounts with helloly
To transfer your email accounts to helloly, you must first create the email accounts to be transferred.
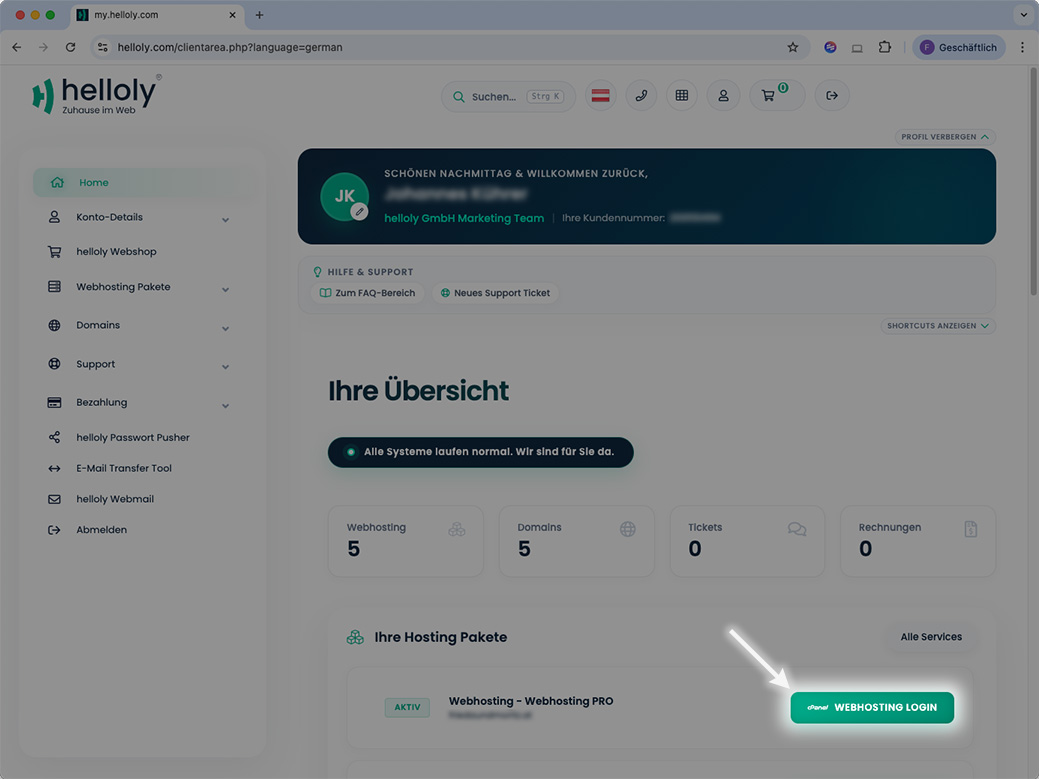
- Log in to the helloly customer center my.helloly.com with your login details.
- Click on Webhosting Login next to the desired hosting package.
- In the Email section, select Email accounts
- Click +Create to create a new email account
- Create your desired email account by entering a username and password.

- Under Optional Settings, click Edit Settings to adjust the storage space for the mailbox. This should be considerably larger than the current storage requirements of your old provider. Tip: If you want to create multiple mailboxes, click Stay on this page after I click Create.

- Create the email account by clicking +Create
Identify your IMAP server name
- Click on Tools in the left blue area to return to cPanel
- Now click on Server Information

- Here you will find the server name that you must select in the next step. (e.g., cloud14)
Step 3: Transfer mailboxes using the helloly mailbox migration tool
Attention: Please leave the browser window open until the email transfer is complete!
- Open the mailbox migration tool at https://mailtransfer.helloly.com/

- Under Old mail server, enter the access data for your existing email account with your old provider.
- Under helloly.com mail server, enter the access data for your new email account with helloly and select the previously determined IMAP server name (e.g., cloud14.helloly.hosting).
- Click on Start transfer! The progress bar shows you that your emails are being transferred. It appears after 30 to 60 seconds. Note: If no progress bar appears, the tool cannot log in to either the old or the new server. Please check your access data.
- When the progress bar reaches 100%, all emails have arrived in your new mailbox
- If the progress bar displays unknown % done and unknown % left, an error has occurred and the transfer was probably aborted because the mailbox was too small. You can easily check this by going to cPanel under Email and selecting the Email Accounts function. Then check the storage usage for the corresponding email: Storage: Used / Allocated / %.
- Repeat the transfer process for each email mailbox
- Congratulations – you have successfully migrated your email mailboxes!
- Recommendation: Make sure that your emails have been transferred correctly!
- Open the Email Accounts function in cPanel and click on Go to Mailbox
- Under the roundcube logo, click on the button Open

- You are now in the webmail section of your email inbox, where you can view your email folders and check your mail.
Step 4: Transfer remaining emails (recommended!)
To ensure that your emails received by your old provider during the mailbox migration(s) and the completed domain transfer are not lost, we recommend that you repeat step 4.
Note: Only emails that are not currently in your helloly mailbox will be transferred.
[optional] Book a mailbox upgrade
If you need more storage space per mailbox than is included in your hosting package, you can book a mailbox upgrade and increase the maximum mailbox size by 10 GB. To get even more storage space, you can also purchase the mailbox upgrade multiple times.
- Log in to the helloly customer center my.helloly.com with your login details.
- In the menu, under Web Hosting Packages, select Available Add-ons
- For the product +10 GB Mailbox Upgrade, click Select – Note: If you have multiple web hosting packages, select the package for which you want to book an upgrade
- Complete the order by clicking on Place order
[Special cases] Gmail mailboxes and Microsoft 365 mailboxes
Gmail
For Gmail, you must first activate 2-factor authentication. Then you can activate IMAP. After that, you must generate an app password for IMAP.
You can then log in to imap.google.com with the generated app password. The IMAP email transfer from imap.gmail.com is limited to 2.5 GB per day by Gmail, and experience has shown that the transfer is very slow, with about 1 email every 5 seconds.
Microsoft 365
To retrieve mail via IMAP, IMAP must be enabled for the email address in question. This is handled differently depending on the Microsoft 365 account. Please contact Microsoft 365 Support for more information.
